

These are the step-by-step walk-throughs from the Adobe Photoshop CC 2023 Classroom in a Book. Learn about how to use text in your Photoshop designs. About Type 0:00 Getting Started 1:03 Creating a Clipping Mask from type 1:43 Adding Guides to position type 2:02 Adding point type 3:56 Making a Clipping Mask and applying a shadow 5:44 Creating type on a path 8:30 Warping point type 14:25 Using guides for positioning 16:53 Adding a paragraph type from a sticky note 17:24 Finishing Up 23:09 Purchasing the book: https://www.amazon.com/dp/0137965893/… ISBN-10: 0-13-796589-3 ISBN-13: 978-0-13-796589-2 Learn to create and edit images using Adobe Photoshop Adobe Photoshop Classroom in a Book (2023 release) uses real-world, project-based learning to cover the basics and beyond, providing countless tips and techniques to help you become more productive with the program. For beginners and experienced users alike, you can follow the book from start to finish or choose only those lessons that interest you. Classroom in a Book®, the best-selling series of hands-on software training workbooks, offers what no other book or training program does an official training series from Adobe, developed with the support of Adobe product experts. #betterpix #adobephotoshopcc #adobephotoshop
Adobe Photoshop CC 2023 Classroom In A Book Chapter 6 Masks and Channels
These are the step-by-step walk-throughs from the Adobe Photoshop CC 2023 Classroom in a Book. Learn about the power of a mask and how to make a selection using a channel.
- Working with Masks and Channels 0:00
- Getting Started 0:54
- Using Select and Mask and Select Subject 1:23
- Select Subject Button 3:00
- Refining a Mask 5:43
- Refine Edge Brush Tool 7:15
- Alt Clicking Shortcut 10:12
- Adjusting Global Refinements 10:46
- Completing the Mask 12:12
- Creating a Quick Mask 14:02
- Shift + Click for a Straight Brush Line 15:43
- Background and Foreground Color Shortcut Selections 16:27
- Manipulating an image with the Puppet Warp Tool 17:45
- Using an Alpha Channel to create a shadow 21:38
- Creating a pattern for the background 24:55
Purchasing the book: https://www.amazon.com/dp/0137965893/… ISBN-10: 0-13-796589-3 ISBN-13: 978-0-13-796589-2
Learn to create and edit images using Adobe Photoshop Adobe Photoshop Classroom in a Book (2023 release) uses real-world, project-based learning to cover the basics and beyond, providing countless tips and techniques to help you become more productive with the program. For beginners and experienced users alike, you can follow the book from start to finish or choose only those lessons that interest you. Classroom in a Book®, the best-selling series of hands-on software training workbooks, offers what no other book or training program does an official training series from Adobe, developed with the support of Adobe product experts.
Adobe Photoshop CC 2023 Classroom In A Book Chapter 5 Quick Fixes Part B
These are the step-by-step walk-throughs from the Adobe Photoshop CC 2023 Classroom in a Book.
- Common Lens Correction Uses 0:00:00
- Correcting Image Distortion 1:16
- Lens Correction Filter Options 1:44
- Extending Depth of Field 4:03
- Depth of Field Explained 4:21
- Auto Blending for Focus Stacking 6:32
- Removing Objects using Content-Aware Fill 7:43
- Content-Aware Fill Options 12:27
- Extra Credit Transformations with the Content-Aware Move Tool 13:38
- Adjusting Perspective in an image 15:42
- Creating Quads to Define the Places of the Train 16:36
- Automatically Straighten Near Vertical Lines Button 19:03
- Advantages of a Photoshop Smart Object 20:05
Purchasing the book: https://www.amazon.com/dp/0137965893/… ISBN-10: 0-13-796589-3 ISBN-13: 978-0-13-796589-2
Learn to create and edit images using Adobe Photoshop Adobe Photoshop Classroom in a Book (2023 release) uses real-world, project-based learning to cover the basics and beyond, providing countless tips and techniques to help you become more productive with the program. For beginners and experienced users alike, you can follow the book from start to finish or choose only those lessons that interest you. Classroom in a Book®, the best-selling series of hands-on software training workbooks, offers what no other book or training program does an official training series from Adobe, developed with the support of Adobe product experts.
Adobe Photoshop CC 2023 Classroom In A Book Chapter 5 Quick Fixes Part A
Adobe Photoshop 2023 Classroom In A Book Step-by-Step These are the step-by-step walk-throughs from the Adobe Photoshop CC 2023 Classroom in a Book.
- Introduction 0:00
- What Causes Red Eye in Photography 0:29
- Correcting Red Eye 0:59
- Brightening an Image Using Curves in Adjustment Panel 2:12
- Adjusting facial features with Liquify 4:07
- Blurring around a subject 6:51
- Creating a Panorama 9:13
- Expert Tips for Panoramic Photography 9:46
- Cropping and Straightening 12:10
- Adjusting Levels with Adjustment Layers 13:37
Purchasing the book: https://www.amazon.com/dp/0137965893/… ISBN-10: 0-13-796589-3 ISBN-13: 978-0-13-796589-2
Learn to create and edit images using Adobe Photoshop Adobe Photoshop Classroom in a Book (2023 release) uses real-world, project-based learning to cover the basics and beyond, providing countless tips and techniques to help you become more productive with the program. For beginners and experienced users alike, you can follow the book from start to finish or choose only those lessons that interest you. Learn to: Classroom in a Book®, the best-selling series of hands-on software training workbooks, offers what no other book or training program does an official training series from Adobe, developed with the support of Adobe product experts.
Adobe Photoshop CC 2023 Classroom In A Book Chapter 4 Layer Basics
Adobe Photoshop 2023 Classroom In A Book Step-by-Step These are the step-by-step walk-throughs from the Adobe Photoshop CC 2023 Classroom in a Book.
- Introduction 0:00
- About Layers every Photoshop file contains one or more 0:17
- Getting Started with Adobe Bridge 1:55
- Using the Layers Panel 3:01
- Renaming and copying a layer 6:05
- Viewing individual layers 6:42
- Adding a border using the Stroke layer style 6:58
- Rearranging layers with the stacking order 9:15
- Changing the Opacity of a layer 10:11
- Duplicating a layer and changing the blending mode 11:07
- Resizing and rotating layers 13:12
- Using the Free Transform Tool 13:49
- Using a filter to create artwork 15:19
- Using Render Clouds filter 16:00
- Adding Text 18:37
- Making a Selection from the layer thumbnail 22:13
- Applying a Gradient to a layer 22:38
- Applying a layer style 24:27
- Using the Global Light in the Effects styles 25:14
- Cloning layer styles to a different layer 26:23
- Adding an Adjustment Layer 30:17
- Creating a Clipping Mask 31:38
- Updating Layer Effects 32:32
- Creating a Border from a Selection 34:46
- Flattening and Saving Files 36:08
In this lesson, you’ll learn how to do the following:
- Organize artwork on layers.
- Create, view, hide, and select layers.
- Rearrange layers to change the stacking order of artwork.
- Apply blending modes to layers.
- Resize and rotate layers.
- Apply a gradient to a layer.
- Apply a filter to a layer.
- Add text and layer effects to a layer.
- Add an adjustment layer.
- Save a copy of the file with the layers flattened.
Purchasing the book: https://www.amazon.com/dp/0137965893/… ISBN-10: 0-13-796589-3 ISBN-13: 978-0-13-796589-2
Learn to create and edit images using Adobe Photoshop Adobe Photoshop Classroom in a Book (2023 release) uses real-world, project-based learning to cover the basics and beyond, providing countless tips and techniques to help you become more productive with the program. For beginners and experienced users alike, you can follow the book from start to finish or choose only those lessons that interest you. Learn to: Classroom in a Book®, the best-selling series of hands-on software training workbooks, offers what no other book or training program does an official training series from Adobe, developed with the support of Adobe product experts.
Adobe Photoshop CC 2023 Classroom In A Book Chapter 3 Working with Selections
Adobe Photoshop 2023 Classroom In A Book Step-by-StepThese are the step-by-step walk-throughs from the Adobe Photoshop CC 2023 Classroom in a Book.
- Introduction 0:00
- About selection and selection tools 0:17
- Content and edge-based selections 1:37
- Color-based selections 2:41
- Geometric Selections 3:14
- Freehand Selections 3:37
- Getting Started 4:28
- Using Cloud Documents 5:11
- Using the Magic Wand Tool 6:28
- Using the Quick Selection Tool 8:36
- Moving a selected area 10:15
- Using the Object selection tool 11:30
- Manipulating Selections 12:58
- Repositioning a selection marquee while creating it 13:20
- Moving a selection with the arrow keys 15:48
- Softening the Edges of a Selection 16:26
- Selecting with the lasso tools 18:40
- Rotating a Selection 21:09
- Selecting with the Magnetic Lasso Tool 21:51
- Selecting from a center point 24:08
- Resizing and copying a selection 25:06
- Moving and Duplicating a selection simultaneously 26:42
- Copy Selections with advanced options 28:02
- Cropping an image 29:28
In this lesson, you’ll learn how to do the following:
- Make specific areas of an image active using selection tools.
- Reposition a selection marquee.
- Move, rotate, and duplicate the contents of a selection.
- Use keyboard-mouse combinations that save time and hand motions. Deselect a selection.
- Adjust the position of a selected area using the arrow keys.
- Add to and subtract from a selection.
- Use multiple selection tools to make a complex selection.
- Save your work as a Photoshop cloud document you can easily open in Photoshop on other devices, and for online collaboration.
Purchasing the book: https://www.amazon.com/dp/0137965893/ref=cm_sw_r_as_gl_apa_gl_i_PDKPVPPB1HS91KJAYG5X?linkCode=ml1&tag=betterpix-20
ISBN-10: 0-13-796589-3 ISBN-13: 978-0-13-796589-2
Learn to create and edit images using Adobe Photoshop Adobe Photoshop Classroom in a Book (2023 release) uses real-world, project-based learning to cover the basics and beyond, providing countless tips and techniques to help you become more productive with the program. For beginners and experienced users alike, you can follow the book from start to finish or choose only those lessons that interest you. Learn to: Classroom in a Book®, the best-selling series of hands-on software training workbooks, offers what no other book or training program does an official training series from Adobe, developed with the support of Adobe product experts.
Adobe Photoshop CC 2023 Classroom In A Book Chapter 2 Basic Photo Corrections
These are the step-by-step walk-throughs from the Adobe Photoshop Classroom in a Book (2023 release)
In this lesson, you’ll learn how to do the following:
- 1. Understand image resolution and size.
- 2. View and access files in Adobe Bridge.
- 3. Straighten and crop an image.
- 4. Adjust the tonal range of an image.
- 5. Use the Spot Healing Brush tool to repair part of an image.
- 6. Use the content-aware Patch tool to remove or replace objects.
- 7. Use the Clone Stamp tool to touch up areas.
- 8. Remove digital artifacts from an image.
- 9. Apply the Smart Sharpen filter to finish retouching photos. Purchasing this book includes valuable online extras.
Learn to create and edit images using Adobe Photoshop Classroom in a Book (2023 release) uses real-world, project-based learning to cover the basics and beyond, providing countless tips and techniques to help you become more productive with the program. For beginners and experienced users alike, you can follow the book from start to finish or choose only those lessons that interest you. Learn to: Classroom in a Book®, the best-selling series of hands-on software training workbooks, offers what no other book or training program does an official training series from Adobe, developed with the support of Adobe product experts.
Adobe Photoshop CC 2023 Classroom In A Book Chapter 1 Getting to Know the Work Area
Adobe Photoshop Classroom in a Book (2023 release)
In this lesson, you’ll learn how to do the following:
- Open image files in Adobe Photoshop.
- Select and use tools in the Tools panel.
- Set options for a selected tool using the options bar.
- Use various methods to zoom in to and out from an image.
- Select, rearrange, and use panels.
- Choose commands in panel and context menus.
- Open and use a panel in the panel dock.
- Undo actions to correct mistakes or to make different choices.
Adobe Photoshop Classroom in a Book (2023 release) ISBN-10: 0-13-796589-3 ISBN-13: 978-0-13-796589-2 Learn to create and edit images using Adobe Photoshop Adobe Photoshop Classroom in a Book (2023 release) uses real-world, project-based learning to cover the basics and beyond, providing countless tips and techniques to help you become more productive with the program. For beginners and experienced users alike, you can follow the book from start to finish or choose only those lessons that interest you. Learn to: Classroom in a Book®, the best-selling series of hands-on software training workbooks, offers what no other book or training program does an official training series from Adobe, developed with the support of Adobe product experts.
3 Point Studio Lighting Step by Step Breakdown
Learn how to create amazing studio portraits with 3 Point Studio lighting techniques. Or is there really just 3 lights? Portrait photography in the studio with a step-by-step example. #betterpix #dust2life #portraits #howtophotography
From YouTube Transcript
To start, the first light we want in our setup is our key lighting our key light, is also otherwise known as our main lighting, key light is the same thing as Main Light. I’m using here a very large light on a stand I like my light to go a foot or so above the model’s head I don’t like to be straight on it creates a different shadow angle that doesn’t mimic the Sun so I like to go a foot or two above on the subject so I’ll go up here about a foot or two above and roughly the safe spot the normal spot and you can break these rules about 45 degrees between me and the model that’s our nice 45 degree angle light.
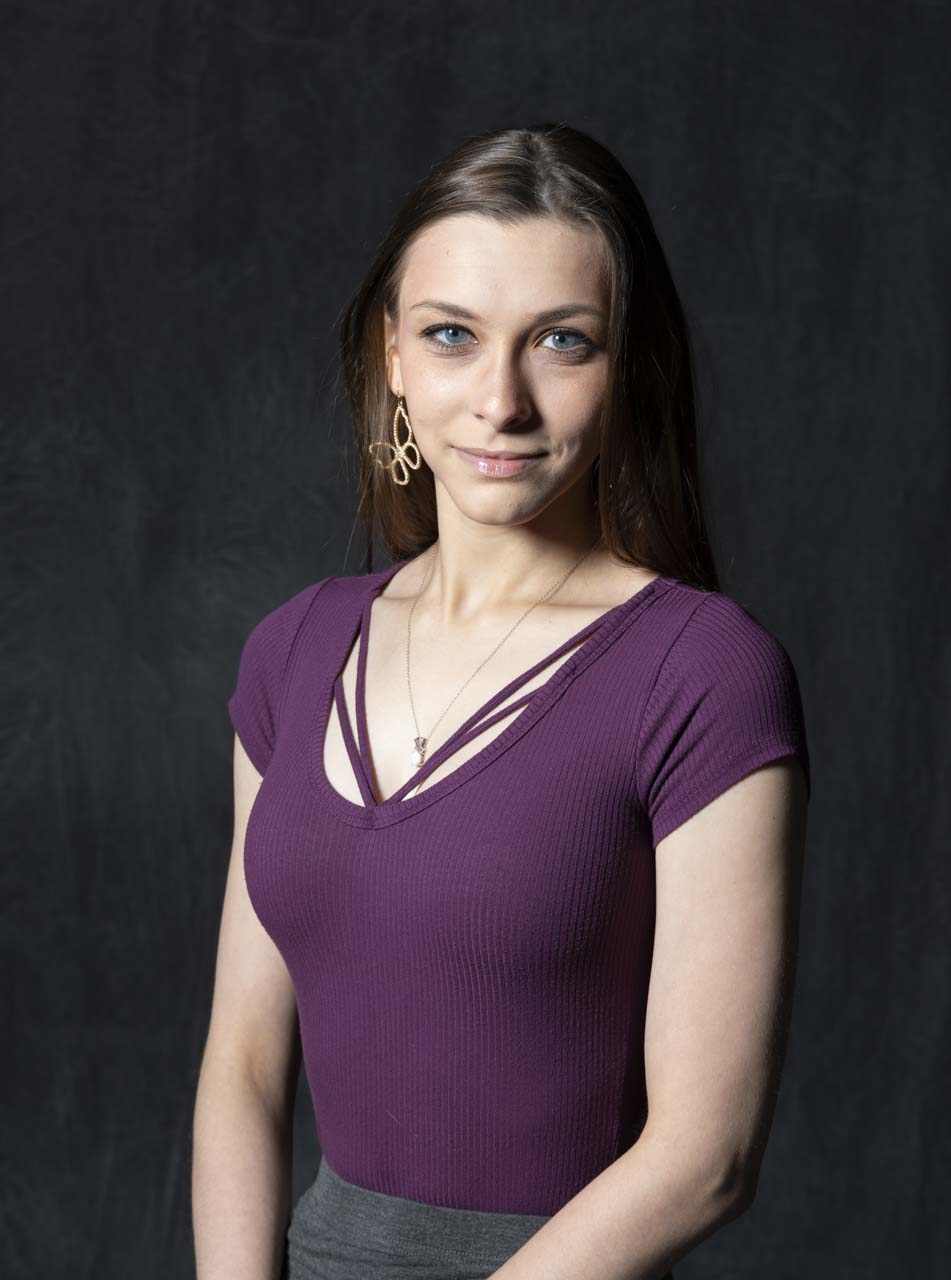


We could bring in a secondary light which would be a light either off to the side how about on the opposite side 45 degree angle or so if you don’t have a second light or an extra additional light you can use a reflector typically I like to use a reflector so I’m using my large reflector it’s about a six foot reflector and I’ll put that off to the side a little bit mimicking The Fill light the second light is the fill light now the thing I like about reflectors is for one they don’t cost as much for two they’re easier to use what I’ll find is someone has a actual another light or Flash it’s hard even if you have different modifiers to know how much is getting to which spot you might be blasting them with the same amount of light the nice thing about reflectors you can’t make this light brighter on the fill side you control the intensity by moving the light the reflector closer or further away but you can’t overpower the main light will still be the main light regardless of settings and modifiers which can be kind of tricky when you start using several different lights so I’m going to use a reflector I’m going to move in about like this on style so you can see the difference on the Shadows on our cheek on her hair it is significantly different than the piece let’s go ahead and bring that in for a photograph looking right here I’m also going to then add a third light now there’s a couple different varieties to this one I’m bringing another flash behind her now some people will move this flash off to the side in the same side as the main light opposite of the fill light they’ll light this one up and bring it onto the side of the face and it helps add like a little sculpting a little Third Dimension to your subject but it’s not necessarily it has to be directly here if you’re doing a tighter shot you could actually move the light behind the person and then it’s still not going to show up in the shot but sometimes don’t people don’t like that being if you’re doing a full body or three-quarter body it will show up in the shot then you have to touch it out then it’s just a pain so a lot of times people move to the side so let’s try one off to the side and then we’ll move one right behind look in your style I can see the reflector kind of coming off to the side let’s move this this called the back light now there’s a difference here we’re going to add in a background light which is definitely four lights and I said there was three kind of like the Three Musketeers so the backlight is on the subject’s back a background light will actually be on the physical background I’m gonna put this onto the back about like there and you can see it’s it’s more subtle you can see it definitely the hair but it’s not doing as much as the other one did but it’s a different look a different feel now I can blast this up a little bit harder if I want to maybe make it more pronounced and let’s try that we’re gonna blast a lot of light there more than I probably typically would I want full power we’ll see what happens and make a glow like an angel you see the difference there is more pronounced on the hand now let’s add the fourth light this fourth light here is considered either a hair light or a backlight depending on how I position it I have it on a boom pole here and if I put it on a boom pool.
It’s going to actually accent the top of her head which is on a hair light now if you’re bald it becomes a headlight okay that’s a bad joke I want some separation for safety so if it falls which it shouldn’t I have sandbags and precautions but if it was to fall get tripped on it’s not going to fall on your person that’s liability painful and a mess we don’t want that so it’s going to fall it’s supposed to fall away from her that’s important in case something goes wrong um so we do have the hair lights and come onto the hair a little bit on the shoulders and then I’m going to take this like that was on her back and I’m going to turn it into a background light just by turning around blasting it right onto the background that’ll create a little different look some subtle variations on the gray background so main light most powerful light on the subject other angle got your reflector or a fill light then you can have a hair light or a backlight or you could even a background light to create all your variations so three point lighting there’s a lot of variations between moving Parts you might not even use a light you can change the angle you can change it you can break up the rules but the key is to make an attractive very nice three-dimensional style lighting background lights are variations lots of things you can put in your Arsenal hopefully that’s helpful we’ll see you next time on better picks in a few clicks thanks for watching better picks in just a few clicks make sure you hit that like button and subscribe to see more videos on how to take your photography to the next level
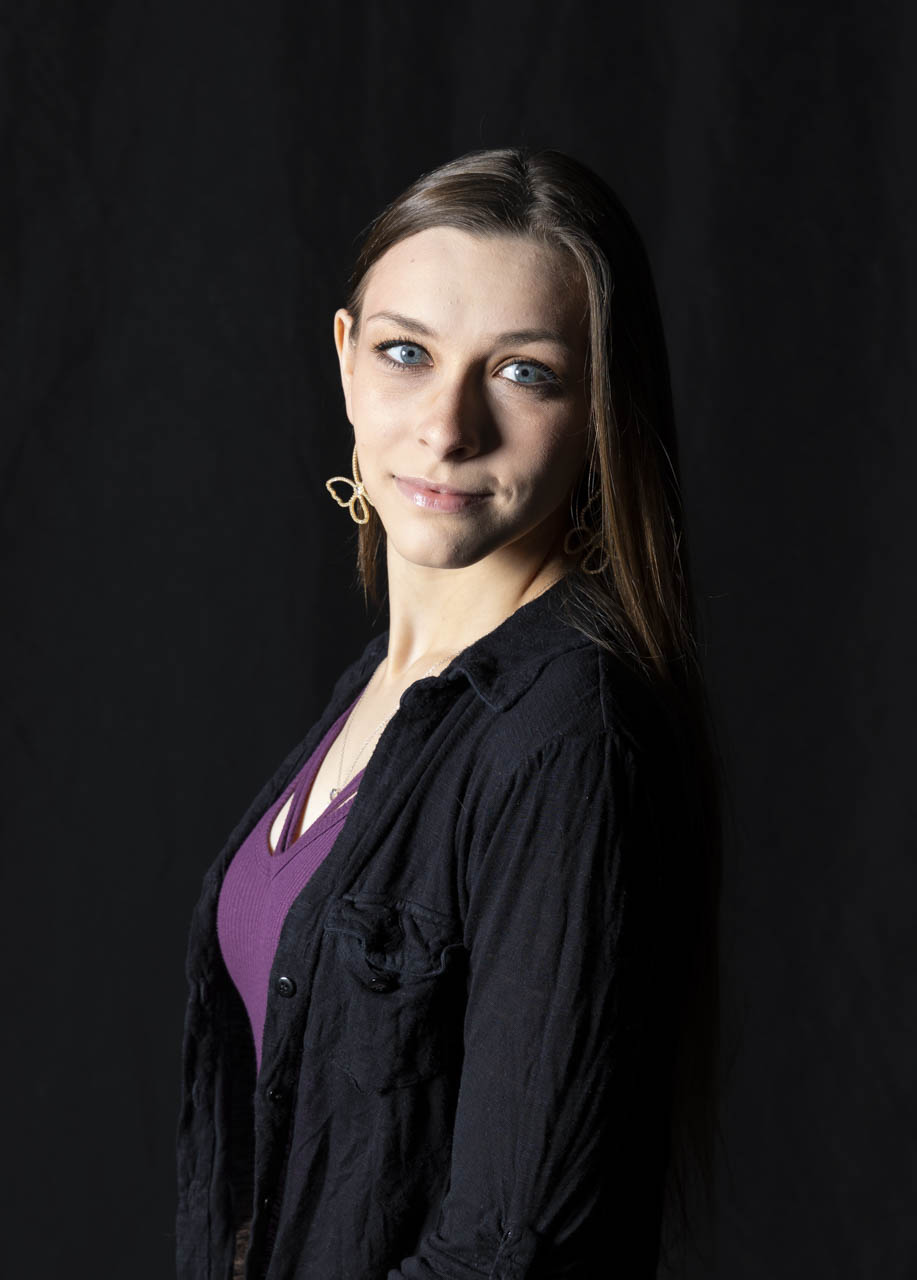
Lighting Portraits Broad vs Short Studio Setups
Learn how to create amazing studio portraits with 2 different lighting techniques. Find out when you should use broad and short lighting and the importance of a light reflector.


Transcript from YouTube
Welcome to better picks in just a few clicks today. We’re going to look at Short lighting versus broad lighting let’s take a look. Portraits aren’t going to be necessarily straight on. In fact, most of the time we want the model to be off to the side a little bit turning their head we see the light is coming off to the side cast a nice light onto starless face that is further from the camera so I’ll go ahead and turn and look a little more this direction and now she’s in turn a little more towards the camera with your eyes there you go and a little more with your head too right there so now the side the further side of her face is now being more Starla now I could do two different things I could make it broad lighting by actually physically moving the light to the other side or I could actually have the model really turn the scene flip the scene so Starla go ahead and turn this way and then she’ll look towards me this way now the closer side of the face is actually getting broad lit right here and there now these are using a one light setup I’m only using my Beauty Dish set up here which is a round setup which helps give a roundness in the uh catch light of the eyes which is very natural like the sun but I’m going to add in a reflector to kind of change some of that tone so staying right there Starla we’re gonna bring in a reflector now you could bring in a different light as well what I’m using here is just a very large about a five and a half foot six foot reflector to bounce in light to change the shadow so it’s not quite as dramatic you’ll see the difference there on Starla’sface it does make a difference as the light reflects onto the face lighting the close side the broadside face and let’s go and flip around for the short light Starla facing your feet towards the camera or towards the light sorry and looking right here and now more of the short style lighting and look more off this side I’m going to change a little more direction as we change our light a little bit it can change some of the style of how dramatic or how intense that short lighter broad lighting is it’s not all the way 90 degree angle from me to the camera. I like to go about 60 to 50 degree angle somewhere in between it’s not straight flat for the camera it’s not all the way to the side it’s somewhere in between and you have some variation as photographer Choice. Short Lighting: Why does it make a difference depending if you want to add a little more drama you want to actually with a broad lighting light the person so it’s easy to recognize them as this is so and so we’re short lighting is a little more uh dramatic there’s more Shadow and it does help to slenderize the face and gives a very attractive portrait as well thanks for watching better picks in just a few clicks make sure you hit that like button and subscribe to see more videos on how to take your photography to the next level.
#betterpix #dust2life #portraits #howtophotography